EXPOSURE, COLOR & MOOD
There is a clear psychological connection between both brightness and color on our moods. Anyone who has spent any time processing images over the years knows that you can return to a raw file you worked a decade ago and see it in a fresh way to create a completely different image. It is probably not too bold to state that the images with the greatest impact on viewers are those where the photographer was very clear in their intent and skilled in its delivery through competent processing. The image almost certainly did not come out of the camera looking like that.
Global Temperature Change – The WB Slider we introduced earlier is a global slider – it changes the temperature (color) of the whole image.
Global Exposure Change – The 5 sliders that control Exposure, Highlights, Shadows, Whites & Blacks are our global adjustments and affect tones distributed throughout the image.
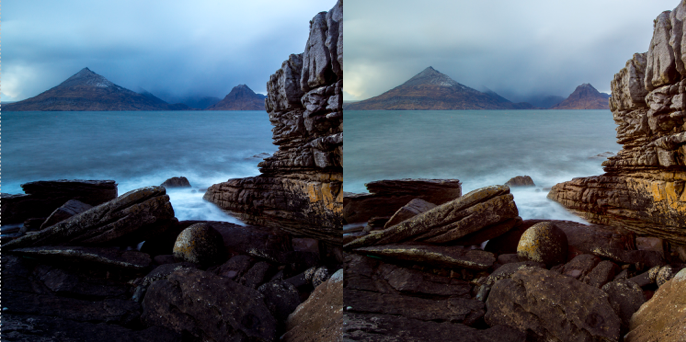
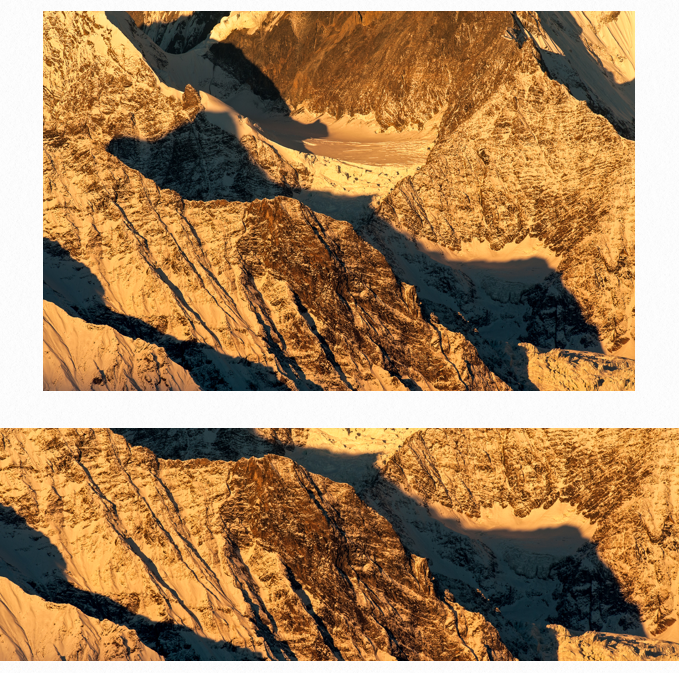
The only adjustments to this and the image next to it are shown below, a screen capture of the Basic Panel in the Develop Module of Lightroom. The shot was taken on a cold, gray evening of a Scottish winter – the image above has a cool feel and therefore expresses that mood.
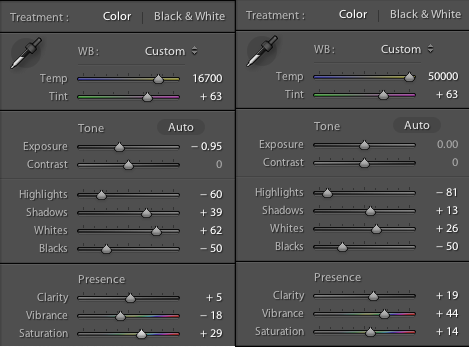
The rendition on the other hand is brighter, with more shadow details and a warmer tone.
It clearly has a more optimistic and emotionally uplifting feel.
The changes are subtle and took a few seconds in Lightroom 5, but the Intent of the photographer and the Impact on the viewer are clearly quite different.
CONTROLLING CONTRAST
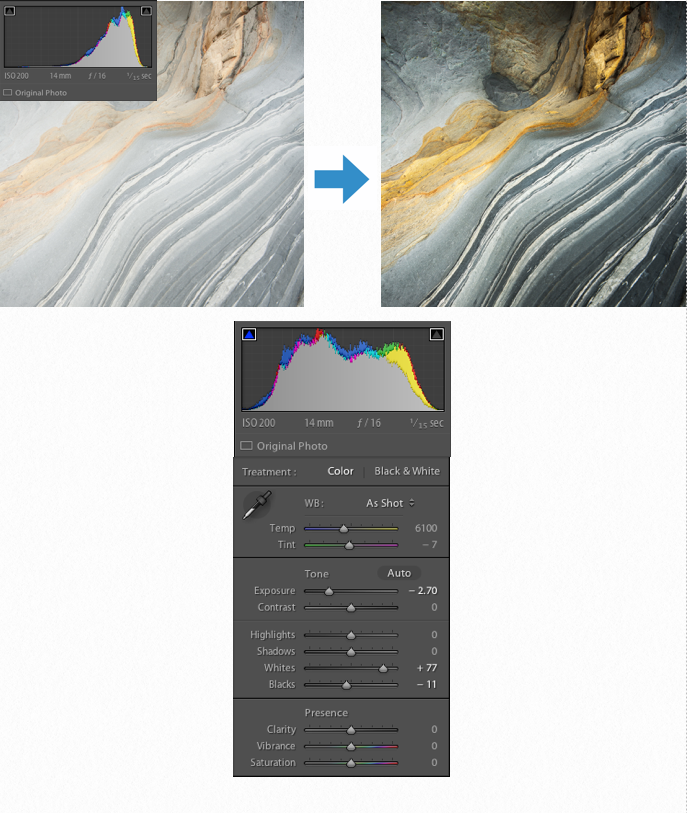
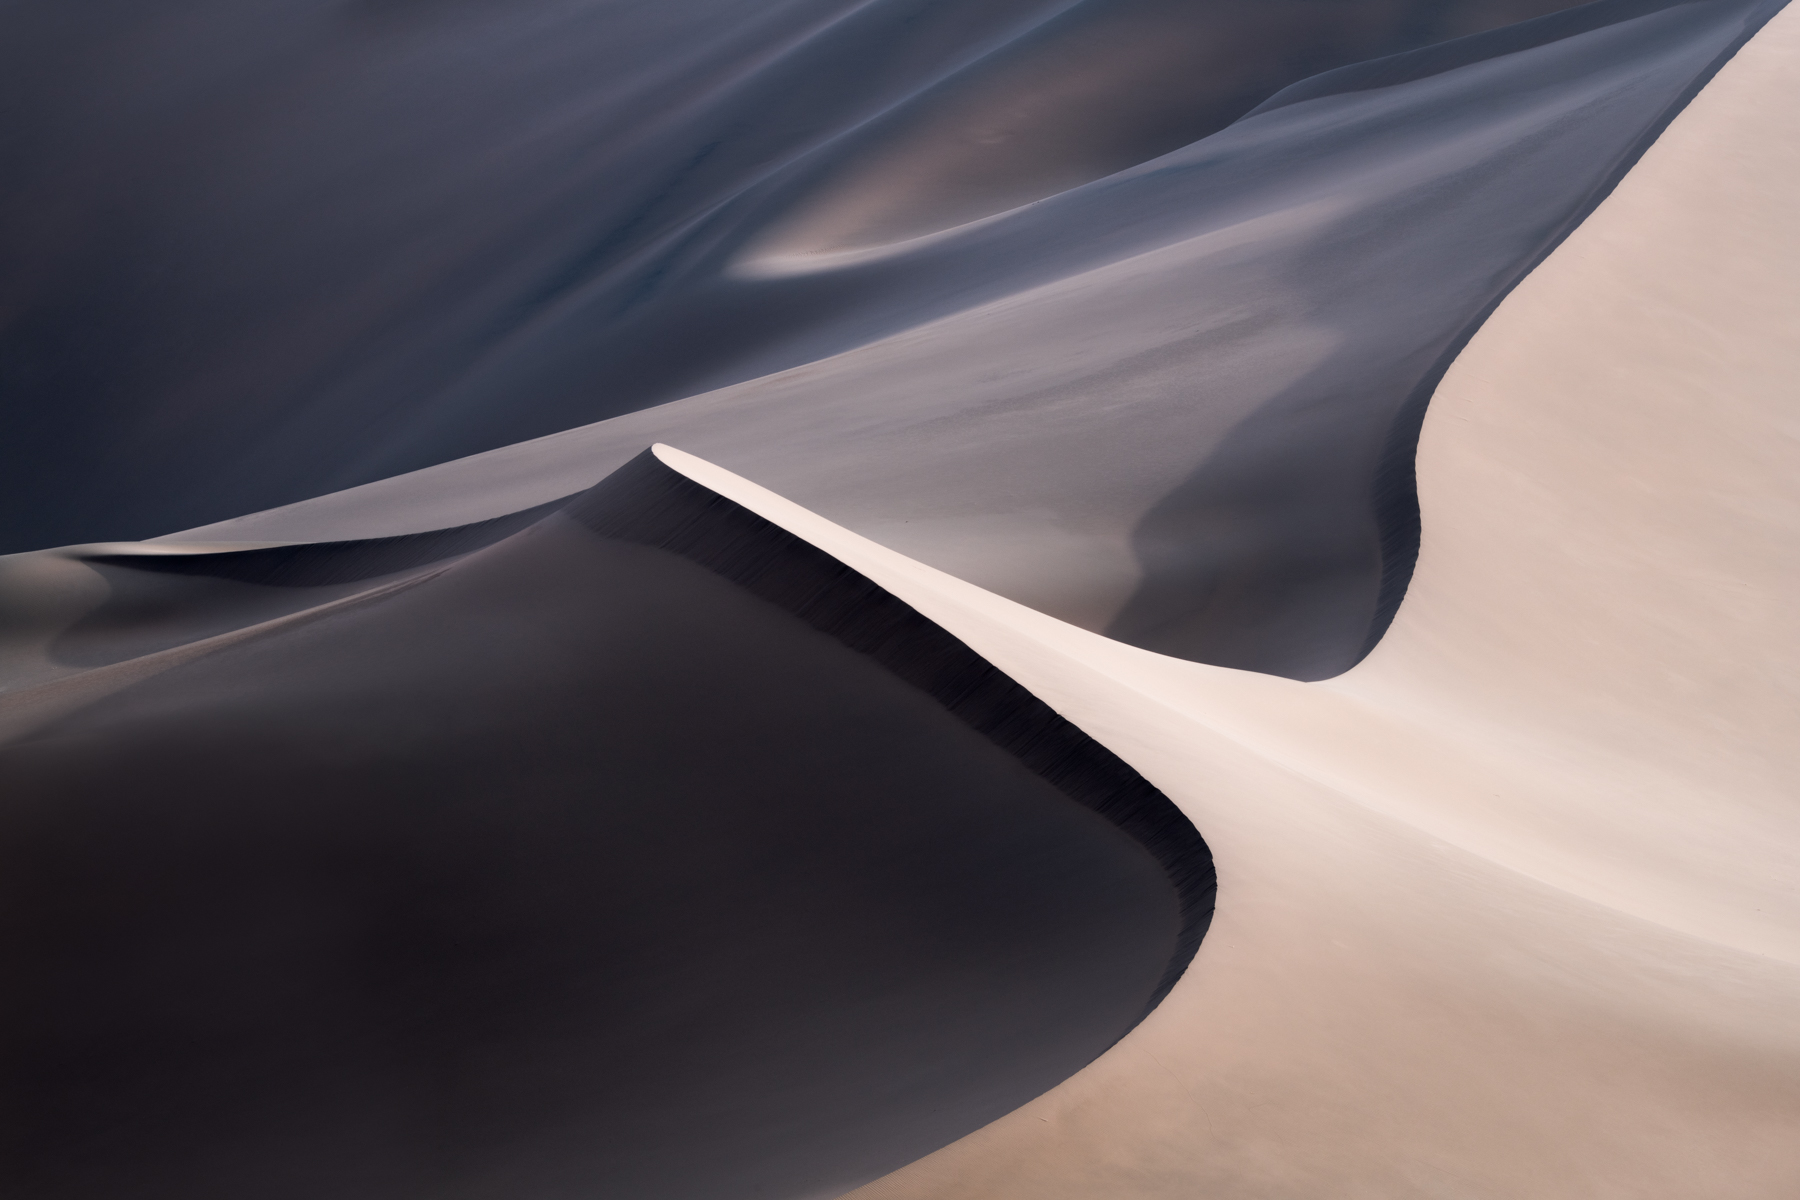
It is not always necessary to set a pure black and white point in processing, but in many cases it is an ideal solution for adding contrast and punch to flat images. The original raw file on the left is flat and lacks contrast, Combined use of Sliders and Curves however, is a great tool for managing global contrast.
Setting the Black & White Points and adding contrast with sliders & curves
- Press the J key to activate the highlight indicators in the top left and right of the histogram.
- Move the Black Slider left until the blue clipping warning indicators show on the image.
- Move the White slider right until the red clipping indicators show.
- The actual Black and White points are momentarily before the warning indicators illuminate.
- Having exposed the raw file to the right, there was plenty of scope to darken the mid tones using the Exposure slider.

Adding contrast with the Curve
- Clicking on the icon in the top left of the Curve window activates a live curve tool.
- Clicking on a dark mid-tone on the image (indicated by the blue arrow) – it is possible to drag down and darken that tone.
- Doing the same with a lighter mid-tone, but this time dragging it up on the image, lightens that selection.
- These are Global Adjustments and affect all tones in that range and the entire image contrast changes.
- This creates the classic S – Curve
“Light and low contrast images tend to be just that – low impact and optimistic.
Dark and higher contrast images have high impact and can be more sinister in feel.”
Once again we return to your individual assessment of what is your Intention and the likely impact on the viewer. There are two distinctions we need to make when talking about Contrast:
Details & Textures – These are dealt with primarily in very local contrast or micro contrast – usually associated with tools such as the Clarity Slider.

We can see just how dramatic the changes in color and contrast can be with just simple adjustments to the Exposure, Blacks, Whites, Highlights, Shadows, Clarity, Vibrance, Saturation and tone curve.
HSL – stands for Hue | Saturation | Luminosity
Hue – the attribute of a color by virtue of which it is discernible as red, green, etc., And which is dependent on its dominant wavelength and independent of intensity or lightness.
Luminosity – how bright a color is.
Saturation – is the intensity of the color.
In the process of Raw Development, we can also use the HSL sliders to have an effect on the contrast within an image, but changing the Hue, Luminosity and Saturation of the colors present.
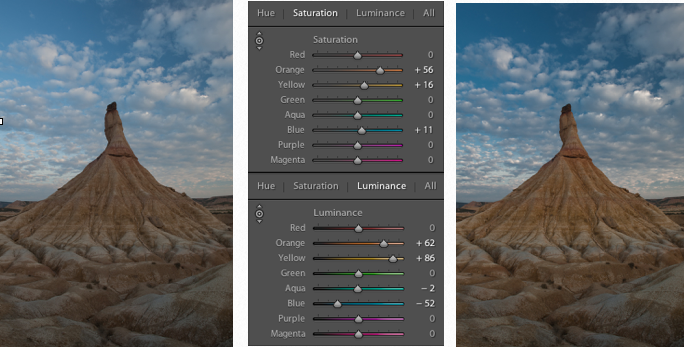
In the above example, the image on the left is a RAW file, with no adjustments at all. By only altering Saturation and Luminosity using the tool highlighted in the red circle to target specific tones – we can see that both Global & Local Contrast have been affected.
Any change to the brightness of pixels will affect the contrast – regardless of which tool in Lightroom is used.
Crop & Meaning
The majority of DSRL cameras have a sensor with an aspect ratio of 3:2
The frame is the most important 4 lines in any image, they define the limits of everything inside it, but reality is not limited by the frame – only the image is.
How lines, shapes and flow interact with the frame edges is a fundamental and vital part of Visual Design. Change the crop and everything changes.
For years film photographers have made images with native aspect ratios very different from the 3:2 ratio.
Specialized Panoramic, 4:5 and 1:1 are all well-known and popular formats.
Digital photographers should try to remember that there are options, and not just blindly stay in 3:2 for the sake of convention.
It is not always possible to compose images exactly the way we want them to be in the field – especially if using a fixed focal length lens instead of a zoom. Cropping allows us to work on only including what we want in the final image, keep it tidy!
Each of these crops, or aspect ratios has a different feel and can be used to create images that are more classic or even unconventional than what others expect from you.
We would advise against using random crops, as it can create an untidy body of work with many images at different dimensions giving the impression the photographer cannot make up their mind.
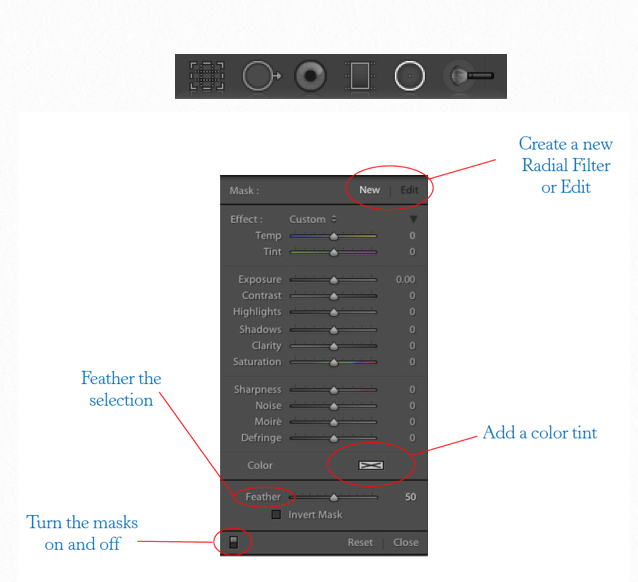
RADIAL FILTER
The Radial Filer is located in the Tabs above the Basic Panel, and can be selected by clicking the illuminated circle or pressing the Shift + M keys on your keyboard.
Clicking on the image and dragging creates an ellipse, or a circle (hold down shift key when clicking and dragging to create a circle). Adjustments to the panel below affect the area outside the circle, leaving the inner area unaffected. (Inverting the Mask flips the effect to affect the inside).
The available adjustments are similar to the Basic Panel, but without the Black, White and Vibrance specific sliders, plus a couple of others detailed below.
What can we use the Radial Filter for?
The four walls of the image frame tell us where the image stops – but they also imply a reality beyond the frame.
There are virtually always lines, curves and subjects that bisect the frame, or interact with it at least. It is natural for us to want to know what happens to these subjects outside the frame. Adding a vignette is an excellent way to subtly keep the viewers eye locked down where we want it – looking at our image. And not off outside the frame asking a lot of what ifs!
In this example, the original image is fine – but the edges of the frame are quite bright and the eye fades out the frame easily.
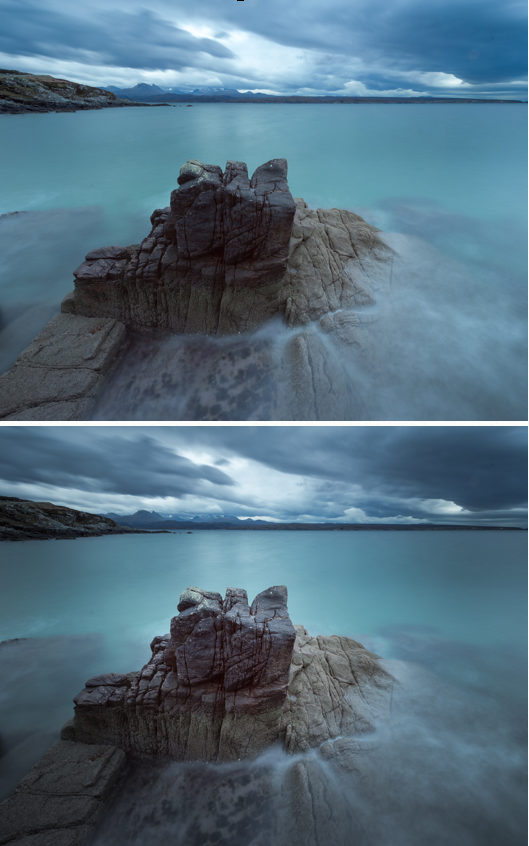
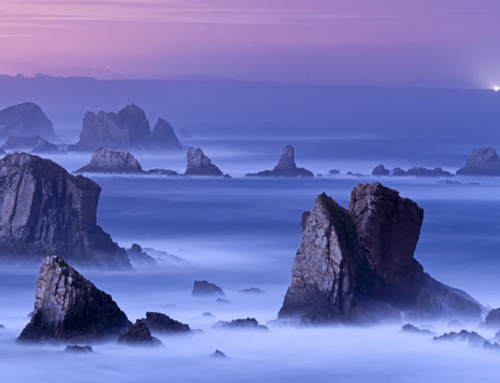
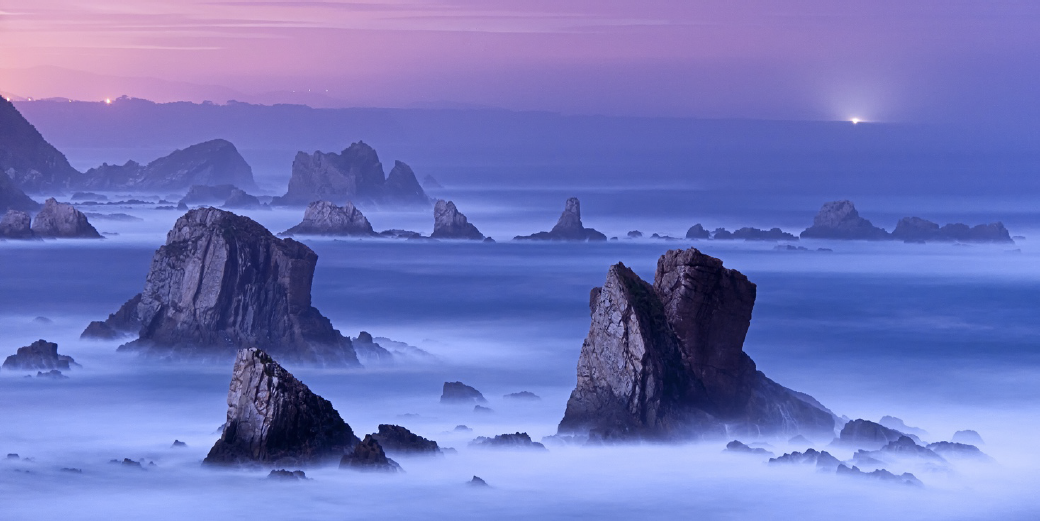
We can use one Radial Filter to darken the edges, and another to lighten the area around the foreground rock, which is clearly the subject of this photograph.
The end result is shown below, and although the effect is subtle and may in fact go unnoticed by the viewer, it has quite a profound, though subliminal impact on the way the image appears.
In this case, because you are looking at both images at the same time, the effects are quite noticeable, but they would not be if the bottom image was seen in isolation.
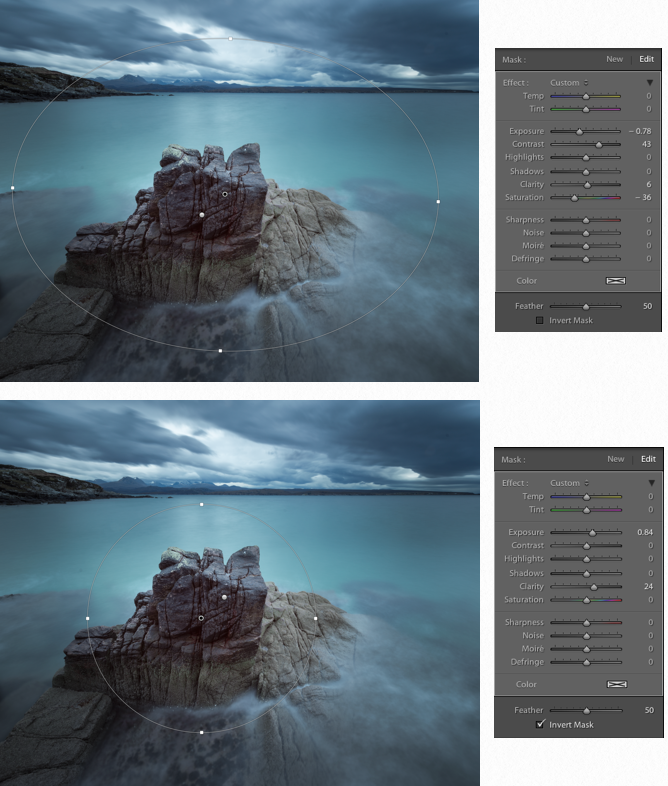
Here are the two Radial Filters marked on the image and the panel adjustments.
This Radial Filter creates a fairly traditional Vignette, by darkening the outside of the ellipse by about 3/4 of a stop. The power of the radial filer however is the ability to also affect color, and by de-saturating the outside it has a twofold effect – taking focus away from that area and by comparison, increasing the apparent saturation inside the ellipse.
The sea stack was still a little flat, so a second Radial Filter to target that area was created – slightly brightening it and increasing clarity adds some definite pop to the main focal point of the image. Subtle, yet effective – if it’s obvious, you’ve gone too far.
LENS CORRECTIONS
Few lenses are optically perfect, even the most expensive. Most suffer, to a lesser or greater degree, from various problems including
Chromatic Aberration – is color fringing that can appear on some edges.
Distortion – an optical problem often seen when flat horizons appear curved.
Vignetting – the optical darkening of image corners due to physics.
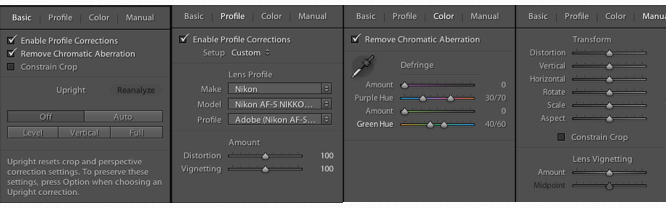
The Lens Corrections area contains 4 Tabs – Basic, Profile, Color and Manual
Basic – Checking the 2 boxes Enable Profile Corrections & Remove Chromatic Aberrations is a great start.
Profile – Having checked the first box, Lightroom will default to the lens you used to make the image. Complex algorithms correct for known issues of distortion & vignetting.
Distortion & Vignetting can both be manually adjusted in this tab, decreasing the corner darkening to eliminate it, or adding it for creative effect.
Color – In rare cases the basic Chromatic Aberration will leave some fringing. In this tab you can correct it manually.
Manual – In extreme cases, especially with very wide lenses, the distortion can be quite extreme – this panel allows more intricate manipulation.
NOISE & SHARPENING
Digital Noise is a product of three things – Underexposure, Long Exposures & Higher ISO settings The latter varies from camera to camera, with some being better than others.
A good go to default setting to start with for Noise Reduction Luminosity between 20-30 | Color = 100
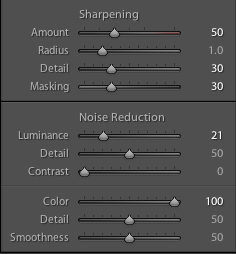
Sharpening – If you shoot jpegs in camera, they are sharpened with a simple preset – high, medium, low etc. RAW files tend to look quite soft by comparison.
In Lightroom you can apply a little sharpening just to pop the details a little – typically
Amount = 50 | Radius = 1.0 | Detail = 30
Alternatively, there is a Lightroom Preset found here.
Presets/Lightroom General Presets/Sharpen – Scenic
For Masking – hold down the ALT key while moving that slider and remove the sharpening from everything but the more significant edges.
You don’t need sharp clouds for example.