Metering
Most photographers rely very heavily on their in camera meter.
Centre-weighted average, spot, evaluative, or a handheld light meter and grey cards!
Let’s make this easy – FORGET IT.
Light meters do not work at night – not long after sunset they start getting it wrong, and in the dark they just freak out.
From this point you are in the realm of Manual Exposures, and honestly, it makes life a whole lot easier.
Night Photographers Guide to Exposure
The problem starts when people try to define what exposure is – all I am going to say is that you have to “expose” your sensor to the available night light for a period of time to record some light.
And there are only THREE things to consider when it comes to Night Exposures. ISO – Shuttle Speed- Aperture
Any shot you are ever going to take is a combination of those three things, and the way we use them to create our final exposures is as much a Creative Decision as a Technical Challenge.
All three of them can adjust the amount of light that reaches the sensor, and as we’ve already demonstrated various combinations of them can create Histograms/Exposures that have identical properties, but the images look completely different.
This is what Night Photography is all about, exposing the frame long enough to Harvest the Light and using a combination of the only three variables there are to determine how the image looks.
SHUTTER SPEED
In most modern DSLR cameras the range is between 1/8000th of a second to 30 seconds – for the majority of Night Photography,
you can forget about the fractions.
When you use BULB mode, the shutter will stay open as long as you tell it to, from minutes to hours. The actual time you keep the shutter open is a factor of whether you want to have sharp stars or more static clouds, or big swirling star trails and/or streaking movement of cloud, mist or water.
Use Shutter Speed to determine MOTION & MOOD
A raging ocean turns to mist in this exposure long after sunset. By cranking the ISO extremely high, I could have rendered some detail in the waves, but chose this combination of the three variables for precise artistic expression.
In this case f4.8 was the minimum aperture of the lens I was using, and 400 ISO is one that I know renders low noise images if exposed correctly.
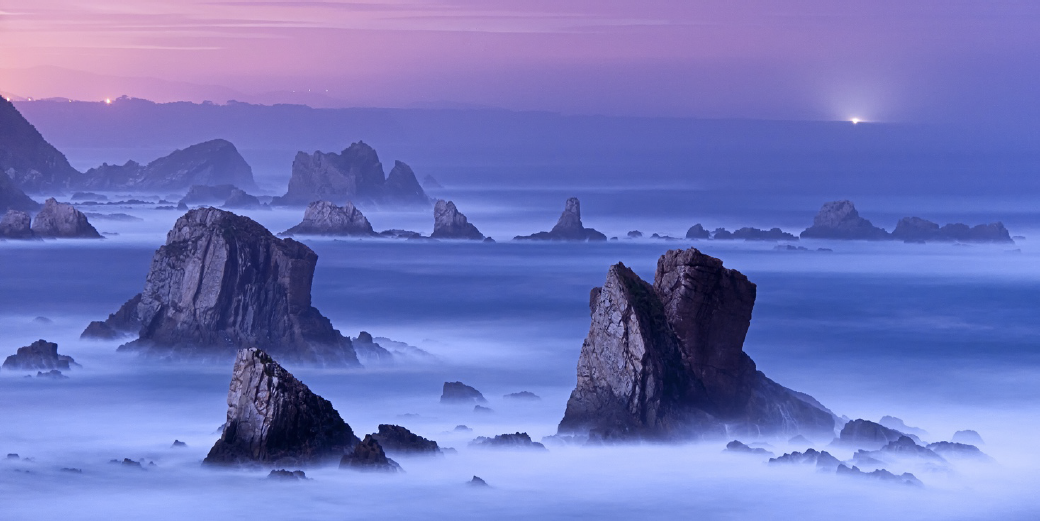
Asturias, Spain Week 4 – 4% moon @ 20:02pm – Nikon D3x 70-300 – 101s @ f4.8 ISO 400
Aperture
The Aperture is the hole in the lens through which the light makes its way to the sensor. Usually referred to as a range of f-stops with small numbers like 1.4, 2.8 representing big holes, and larger numbers like f16, or f22 meaning very small holes.
The smaller numbers let in a lot more light and are most commonly used in night photography, but there are of course exceptions.
The second function of Aperture is to control Depth of Field – the amount of the image that is acceptably sharp. As the aperture hole gets smaller, the depth of field increases.
Use Apertures to mostly control DEPTH
We will cover the Depth of Field calculations and implications in the Composition Chapter.
However, another substantial factor to consider when choosing your aperture is how many stars you want to be visible in your final image.
Shooting at f2.8 for 30 seconds @ 800 ISO will reveal very high numbers of stars, whereas by the time you have stopped down to f8 for example, the number of stars will be significantly reduced.
This can actually be a good thing, as star trail images at large apertures can look extremely busy as every star is producing a trail, creating a crazy mess. Stopping down reduces the number visible and gives the individual trails more space.
Sichuan, China Week 1 41.6% moon @ 20:01pm NikonD700 24-70/2.8 @ 40mm 15s @ f2.8 ISO 2500
The High ISO Test shot above showed good numbers of stars, but I wanted to reduce that number for the final image, producing a more spacious effect, rather than very busy trails. I actually used a 2- stop ND Filter to seriously reduce the stars numbers in this bright moonlit image.
Sichuan, China Week 1 – 41.6% moon @ 20:10pm – Nikon D700 24-70/2.8 @ 40mm – 2702s @ f5.6 ISO 100
The image Above shows the results of that aperture and ND adjustment.
It is well worth remembering that Aperture has this impact on the number of visible stars in any given exposure, it becomes increasingly important when we consider stars as subjects in our compositions. By dialing in a smaller aperture you have creative control of the number of stars that will be visible in your finished images.
ISO
This is the digital equivalent of film speed, and for me it is a creative variable. I rarely make an Exposure judgement based on ISO, I use it to fine-tune the creative combination of Motion and Depth that I came to with my Shutter Speed and Aperture choices.
If 30 seconds at f5.6 is 2 stops too dark at ISO 200, I will take the image at ISO 800 to add the 2 stops of exposure back into my image.
Thinking that ISO 200 is less noisy than ISO 800 is nonsense, as the final shot will be better exposed at 800 than if I try to get those two stops back later by brightening a RAW file shot at 200.
ISO is the magic switch to add or subtract exposure brightness when your creative choice has already been made with your selections of Shutter Speed and Aperture.
Noise & Underexposure
These two walk hand in hand – one of the most common mistakes that people new to night photography make is underexposing their images, which they then try to rectify in processing. This rarely produces a satisfactory result.
Bringing back details from an underexposed shadow is the surest way to bring excessive noise into your images.
Sure, ISO comes into play in this too, with your cameras native ISO being the best to shoot at. For my Nikon D3x it performs best at 200 ISO, but I can shoot up to 1600 ISO quite often with very usable results, as long as I expose the frames correctly.
With the D700 I was able to shoot up to ISO 2500, and with the newer super capable cameras, the sky is clearly not just the limit.
As camera sensor technology advances in the coming years, fresh avenues of creativity are opening up to the adventurous night photographer. Getting supper sharp images by moonlight in 10 seconds will be marvelous; for now, all of us have to accept there are some limitations to what our cameras are capable of, regardless of how much they cost.
On the plus side, Adobe Lightroom, Adobe Camera Raw and many third party plug-ins like Topaz Denoise are excellent at dealing with noise, and images can be corrected very nicely in processing. But the key, I believe, is a well-exposed starting point.
The Histogram
This wonderful graph that is displayed on the back of your camera is the best present you are ever going to get and the surest way to making better images NOW.
Use the Histogram, it does not lie and is the ONLY true gauge you have of the actual exposure you have just taken.
Warning – Never believe the Preview Screen when evaluating your night exposure. You’re in the dark, your pupils are wide open trying to make the most of the dim night light and you are looking at an illuminated display in glorious color. Of course it looks bright and well-exposed!
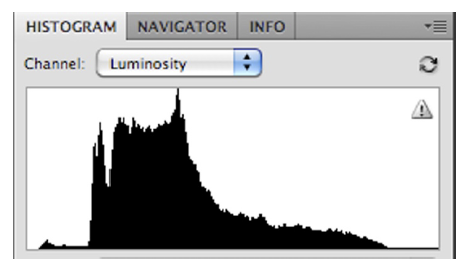
In this Histogram, we have a graph with two axis – the vertical axis is an expression of quantity, with higher numbers of values reaching higher into the graph.
The horizontal axis shows luminosity values, with 100% Black, represented with the RGB Value of 0,0,0 on the far left, and Pure White, represented by 255,255,255 on the far right.
The overall graph shows the image expressed as the total distribution of pixel values by luminosity.
Histograms can also be viewed in the three Primary Colors, Red, Green and Blue, which can give a more detailed expression of the color distribution of the image, and if a color cast exists.
Good Exposures
How can the Histogram help, and what does it tell us?
Firstly, we have to split the definition of exposure; in one we need to talk about the traditional definition of exposure and the histogram
values – the Capture. In the second, we are talking about the final image that is being viewed online or in print, the presentation – the Output.
When we are out in the field and evaluating the scene, quantifying the available light and the relative luminosity of our subjects, I believe we should be aiming to capture a good exposure. By that I mean a histogram that contains values that we can work with later to create an expressive output.
If we split the Histogram into quarters, a night image that has the majority of its tonal values in the first quarter on the left would be considered UNDEREXPOSED.
One should be aiming for a Histogram that contains the majority of its tonal values in the 2nd and 3rd quarter, essentially the mid tones. The stars themselves will be in the 4th Quarter, as they are highlights, and it matters not if they get clipped.
The Histogram is the only true guide to the exposure that the camera has recorded. It is better to record a brighter exposure as we can darken it in RAW Processing, but it is almost impossible to brighten an underexposed image without bringing serious noise into the shot.
Darkening a well-exposed capture for final Output is infinitely preferable to lightening an underexposed one.
Underexposure is far more of an issue at night than overexposure, unless you are shooting waterfalls, snow, surf or coral sand under a completely full moon.
Soon, we will be examining Dynamic Range and what the implications are of this in our night images. Some of you will embrace the prospect of shooting multiple frames to represent the scene as you would like, while others will stick with single frame techniques and the inherent limitations they represent.
Scene Evaluation
Whether you are in the school of Proactive or Reactive Photographers, we are at the stage where we are out in the field preparing to take some images. If you are from the Proactive Camp, you know already what type of conditions to expect, in terms of the amount of available night light, you may even have a composition in mind.
If your from the reactive camp, you’ve just stepped out the car and are now in a field somewhere in the pitch dark. Either way, it is time to evaluate the scene.
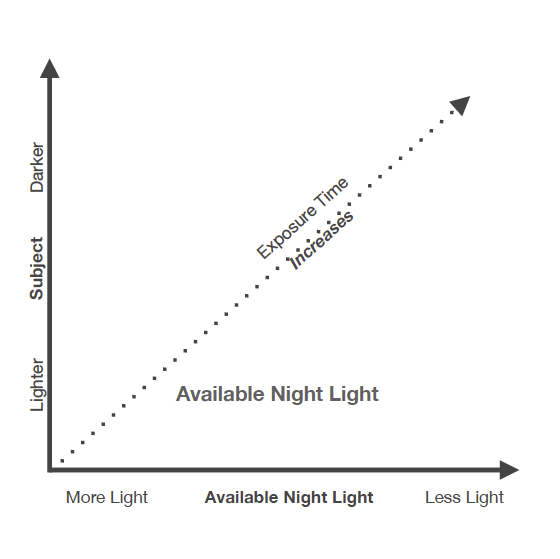
The Amount of the Available Night Light and The Luminosity of the Subjects
Some things get easier the more light there is, others get harder. If it is truly very dark, look for a strong subject to silhouette against very long star trails. On a super bright night, you can try for images with greater depth of field with nice sharp stars in the sky.
Available Night Light is a flexible and forgiving medium, there is usually something you can achieve regardless of the phase of the moon.
With night photography it is far less about what you would like to shoot, but what the light will let you shoot. Don’t back yourself into a
corner with predetermined ideas. Preparation is great to get an idea of what to expect, but the only way to successfully plan your shot is with accurate scene evaluation at the time.
With clouds streaking like this, stacked shots can become very messy, which meant a single exposure was all I could do for this composition. I worked out that around 26 minutes would be enough for a good exposure without risking the brighter areas starting to clip.
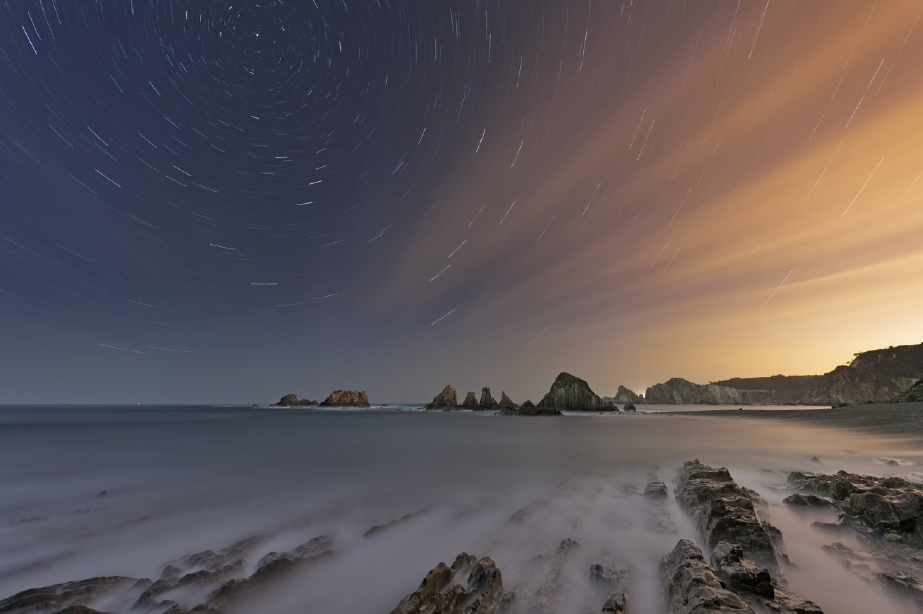
Asturias, Spain – Week 1 – 28.5% Moon @ 01:47am Nikon D3x 14-24/2.8 @ 15mm – Single Exposure 1552s @ f4 ISO 50
Luminosity
The amount of available light is obviously very important, but equally, how bright is your subject? At night, lighter subjects really reflect the light and will expose well; snow, light sand, clouds, surf, waterfalls etc. Things like dark rocks, conifer forests, soil etc hardly reflect any light at all. The scene evaluation is to fulfill two things, working out what compositions will be possible given the available light, and getting a feel for how long an exposure you’re able to do.
But, without an effective way of metering a scene in dim light, how can we effectively assess available night light, luminosity and exposure? We cannot simply employ trial and error, especially in the dark, when it can take over an hour to get a proper exposure.
Thankfully there is a quick and easy solution that solves the majority of our problems in night photography – not just in assessing correct exposure, but checking composition, framing and if the shot is sharp or even level.
Exposing at night Case Study
The High ISO Test Shot
By far the easiest and quickest way to evaluate a scene is with a High ISO Test Shot. This is what to do –
1 – Put a wide angle lens on your camera.
2 – Set the Shooting mode to Manual (M)
3 – Set the aperture to f4 or 2.8 if your lens has that aperture.
4 – Set Shutter Speed to 30s
5 – Either use AF and focus on the moon (effectively infinity) or
6 – Have someone hold a flashlight 5m away and focus on that
(roughly hyperfocal distance at 24mm f4)
7 – Place the camera on a tripod and point it in the direction you want to shoot.
8 – Set the ISO at 1600 (turn OFF long-exposure noise reduction)
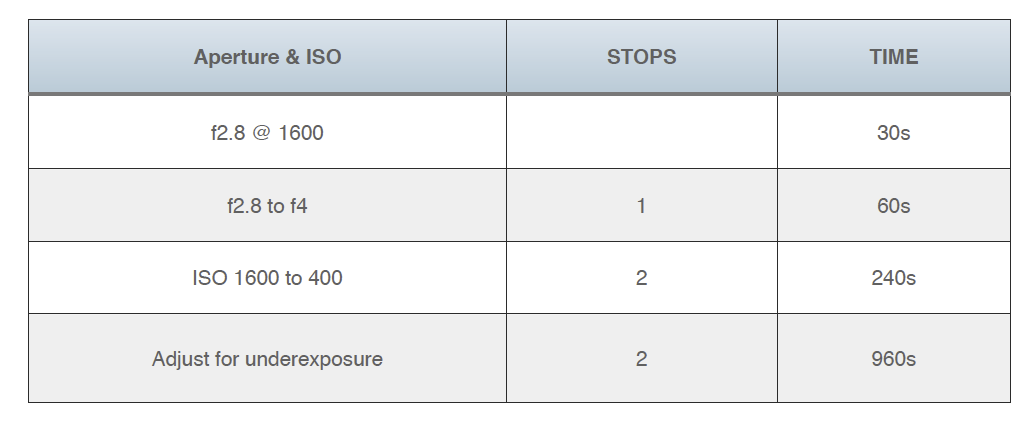
Take ONE shot. The 30s exposure will vary hugely depending on two things – The amount of Available Night Light and the Luminosity of your scene. Examine the histogram and determine if the image has tonality that is workable. If not, repeat with a higher ISO – 3200 for example – one stop brighter. Repeat this until you have a histogram with a good dynamic range being displayed. First we took a High ISO test shot, then we’ll look at how the information we gathered was interpreted to create the longer exposure shown here.
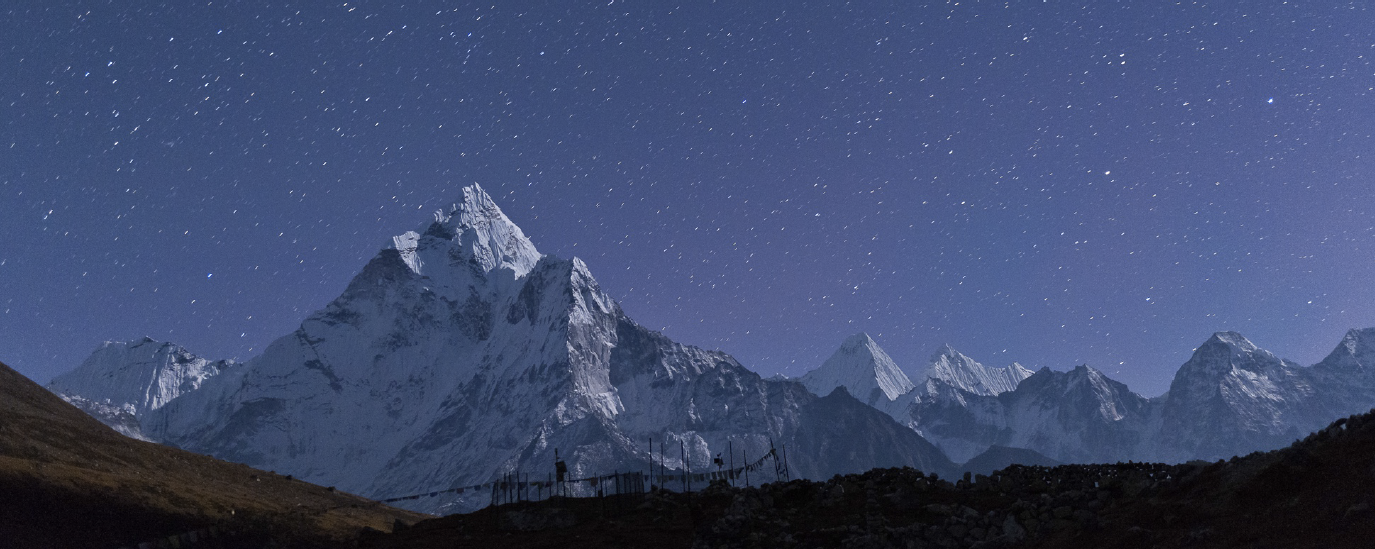
Ama Dablam, Nepal – Week 1 – 31.8% Moon @ 21:05pm Nikon D3x 24-70/2.8 @ 40mm – Single Exposure 30s @ f2.8 ISO 1600
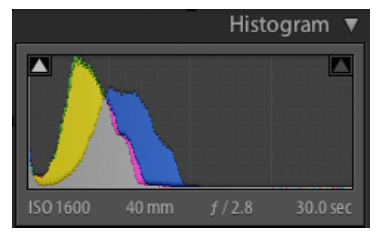
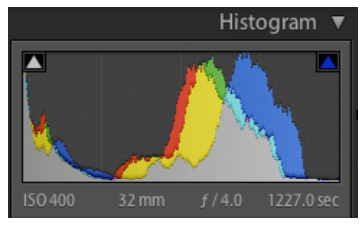
The High ISO test Shot was 30s @ f2.8 ISO 1600, and from reviewing the histogram, it was clear I could easily add two stop of exposure and not clip the whites of the moonlit snow. The moon was setting behind a ridge to my right and I knew as it set I could add a further 5 minutes to the exposure without blowing out the snow. This was a somewhat random addition, but once the moon had set I could probably have kept the shutter open a lot longer, but wanted to err on the side of caution to avoid over-exposure issues.
The previous image histogram shows the exposure from the High ISO Test Shot. As should be clear, it is quite underexposed, and there is easily room for the two stop exposure increase we dialed in on the previous page. The histogram on the right is from the final image, and it is a far better exposure than the first. It is worth mentioning that in changing light conditions (cloud cover, moon rising or setting etc) the short High ISO Test Shot can vary significantly from the longer exposure.

Ama Dablam, Nepal – Week 1 – 31.8% Moon @21:10pm Nikon D3x 24-70/2.8 @ 32mm – Single Exposure – 1227s @ f4 ISO 400